Punny Valentines Day Party | DIY Party Planning

If there is one thing I love an awful lot, it has to be cheesy puns! Not because they’re actually funny but because they’re witty! That’s why when the thought crossed my mind to throw a Punny Valentines Day Party for our youth group at church – I knew I had to do it!

So I scoured the internet in search of the best puns, wrote a few myself and then designed an entire party around them! From decorations, to food – everything was a lot of PUN! (I mean, fun. 😉 You know I had to.)

When I was on IG live recently, I showed you all some of the graphics I made for it and you all really loved it! (Which made my pun-loving heart so happy!) So I decided to throw all the resources you need to plan your very own Punny Valentines Day Party into one blog post! Let’s jump right in.

Punny Valentines Day Food

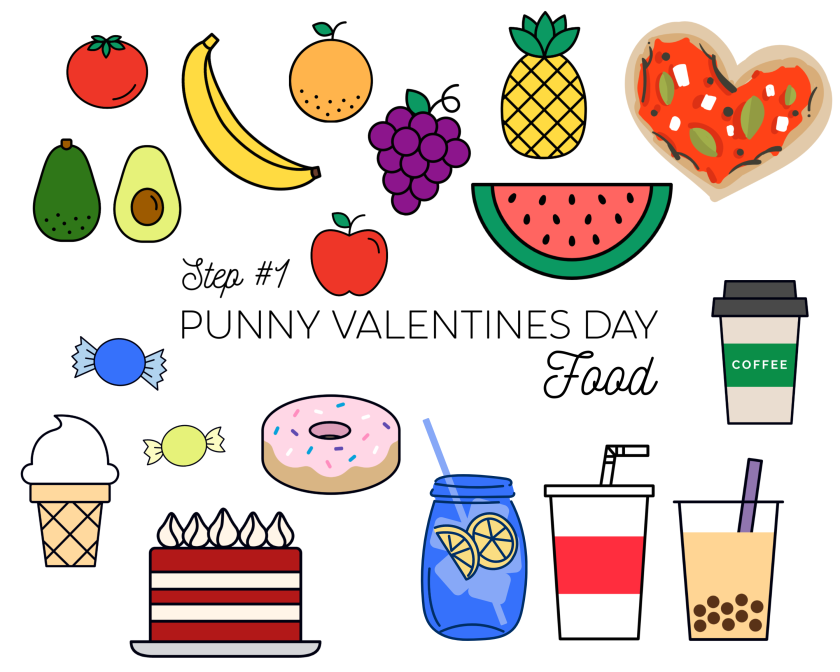
PUNNY VALENTINES DAY FOOD IDEAS

Savory Foods
Pizza – “You stole a pizza my heart!”
Tacos – “Let’s taco-bout love.”
Chips + Guacamole – “You guac my world, Valentine!”
Chips + Salsa (Tomatoes) – “I love your from my head to-ma-toes.”
Queso – “In queso you didn’t know, you’re awesome!”
French Fries – “I only have fries for you!”
Tater Tots – “I like you an awful tot!”

Sweet Foods
Fruit Salad/Fruit Tray
– Pineapple – “You’re a fine-apple!”
– Watermelon/Cantaloupe/Honeydew – “You’re one in a melon, Valentine!”
– Apple – “You’re the apple of my eye!”
– Berries – “You are berry cute!”
– Pears – “We’re a perfect pear!”
– Grapes – “You look grape, Valentine!”
– Bananas – “I’m bananas for you!” or “I like you a whole bunch!”
– Oranges – “Well orange you cute!”
Donuts – “I donut know what I’d do with you!”
Ice Cream – “My heart melts for you.”
Cake – “Darling, you take the cake!”
Mints – “We are mint to be!”

Drinks
Tea – “Well aren’t you a cu-tea!”
Lemonade – “You’re my main squeeze!”
Coffee – “I like you a latte!”
Soda – “You are soda-lightful!”

Punny Valentines Day Decor

PUNNY VALENTINES DECORATIONS
All items in picture are linked here.

One of my favorite parts about this V-day theme is that not everything has to be pink and red or pink and purple. I went ALL OUT with color and black and white stripes to tie it all together! It was so much fun. Here are the supplies I used to decorate with (along with alternatives that might work better for you!

Tables
Round Colored Plastic Table Covers
-To cover the tables for seating and eating. #RhymingIsFun

Black and White Striped Plastic Table Covers
-I used two to cover the food and drink tables. I ALSO hung one on the wall as a photo backdrop. You can also, cut one into strips to use as table runners. You do you, boo boo!

Decorations
Cutie Fruity Foil Balloons
-These balloons were a HIT and took the party decor to the next level! I filled them up with a helium tank (This is the one I buy from Walmart.) 

120 Balloons – Rainbow Assortment
– I picked out complimenting colors and created bunches of balloons with the fruit ones, and set them on each table. Note: You will have A LOT of extra 12 in. balloons which you can use to create a balloon “swag.” (Kit linked next.)

Balloon Swag Supplies
– These supplies are SO easy to use and you will have extra tape/dots/supplies to use again later!

Glitter Heart Garlands
– I used this over the black and white stripe photo backdrop and it tied right in! 🙂

Graphics + Printables

Punny Valentines Day Printables Graphics (1)

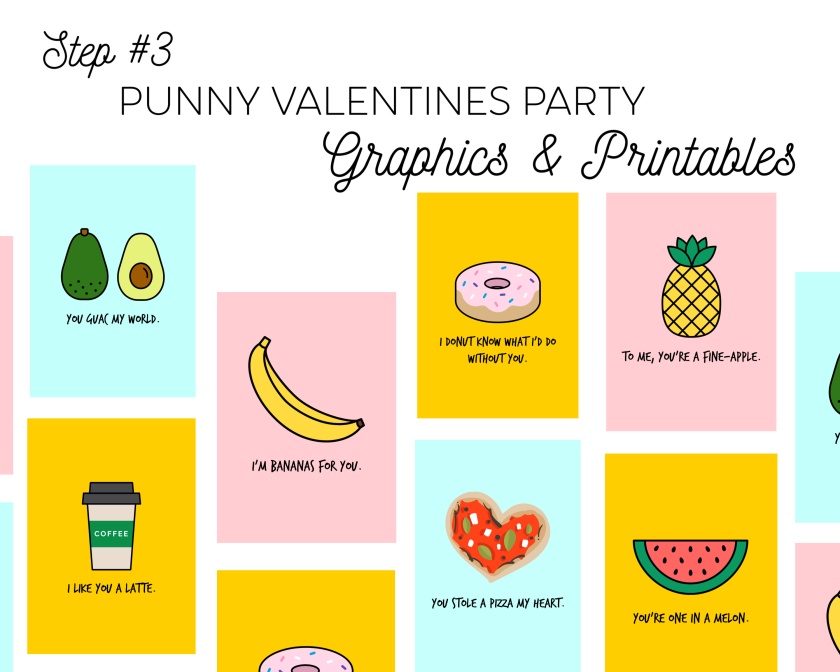
I created these Punny Valentines Printable Cards for the party we threw and I want to give them away to you FO FREE! If you want them, all you have to do is sign up for my email list and I’ll send them your way. 🙂

Okay guys! I hope you enjoyed this little party planning session – I know I did! If you decide to throw a little Punny Party, make sure to let me know here or on instagram. I’d love to see pictures!

Until next time – Best + Blessings!

Chrisi

DIY Wood Slice Picture Ornaments | DIY Christmas | How to

Happy Friday before Christmas 2019 (AKA – December 20th!) This week I taught a crafting workshop at a local biz Christmas party. Many of you over on Instagram were asking for a tutorial for the project we worked on so here it is! We made DIY Wood Slice Picture Ornaments, everyone’s looked great and we had fun!

Now let’s get started.

img_9473

Needed Supplies
4×6 Picture (Same Day Printing at Walgreens is what I used)
Scissors
Exacto Knife
1inch Foam Brush
Sharpie Pen
Mod Podge (Satin or Gloss finish works best)
Wood Slice Ornament (Here’s a link to the ones I bought on Amazon. Great deal!)
Twine (Mine came with my wood slice ornaments.)

img_9480

Step 1: Place ornament strategically on top of the subject(s) in your picture. Pay close attention to what isn’t covered by the slice. If you can still see it, it won’t be seen on the ornament. (Sounds like a no brainer but this step sometimes trips people up. Just pay close attention to where you place the ornament.)

img_9482

Step 2: With your sharpie pen, trace around the wood slice directly on your photo. If you are worried about the placement of the ornament, make a few small dots around the ornament first. Then check the placement and THEN trace around the entire thing.

img_9485

Step 3: Cut just INSIDE of the circle you drew.

img_9489

Step 4: Trim and check, trim and check! Keep trimming down the edges of your photo until there is a little bit of the wood slice showing around the entire photo. (This is important. You will need the space to help your picture adhere to the ornament.)

img_9493

Step 5: Using a foam brush, apply a thin layer of Mod Podge to the center of the wood slice. Then dab a little bit of Mod Podge in the center of your photo. Then place and press your photo on the ornament.

*Note: Be mindful of where you place your photo and where the hole on the ornament is. For example: Try to place faces away from the hole. You don’t want to poke a hole through someone’s forehead! 

img_9496

Step 6: You can do this step multiple ways.

Option 1: Take your exacto knife and poke an x shape into the hole of the ornament through the picture. Then gently fold the edges of the X you cut down into the hole.

Option 2: Take your exacto knife and cut a notch out of the top of the photo where the hole of the ornament is.

img_9499

Step 7: It’s time to seal these babies! Take your foam brush and apply a thin layer of Mod Podge HORIZONTALLY across the top of your ornament. Make sure to brush from edge to edge of the ornament without running off onto the sides of the wood slice.

img_9500

Step 8: Let it dry completely!

img_9503

Step 9: Apply a thin, second coat of Mod Podge VERTICALLY from edge to edge. Let it dry completely before handling.

img_9518

Step 10: Take the twine and string it through the ornament.

PRO TIP: Wrap some scotch tape around the end of the twine to help you string it through. Once strung, remove the tape and tie a knot towards the top.

img_9522

Step 11: Enjoy! Make an entire set! Give it as a gift! Use it as a gift tag! The options are endless.

I hope you enjoyed this project! If you follow my tutorial and try it out – let me know! Share it with me here or on Instagram using #ChrisiNikoleDIY!

Happy Crafting! Best + Blessings,

image1-2

DIY Personalized Name Crayons | How to

Christmas time is so much fun but can also be super stressful! One of my favorite things to do each holiday season is to DIY some gifts. It’s both fun and cost-effective! That’s a win-win!

Earlier this week on Instagram (@ChrisiNikole), I shared these personalized name crayons I made for each of my nieces and nephews. To my surprise, many of you asked me how I made them and what I used so I thought “I should share a tutorial on how to make personalized name crayons!”

So without further delay, let’s get to the process.

img_8979

Supplies I Used
Crayons (64 count for a larger variety of colors)
Plastic cutting board (one I will only use for crafts now)
A box cutter
A pairing knife
Small cups 
Silicone letter mold – FOR BAKING (link)
Baking sheet (one I will only use for projects now)

img_8981

Step 1: Remove the paper wrapper off each crayon and dispose of them.

This is definitely the most tedious part which I first tried to do by hand. But THEN David had the brilliant idea of using a box cutter on the shortest setting and cutting right through the paper. If you have a box cutter, this is the way to go!

img_8983

Step 2: Using a pairing knife (or other small knife) cut crayons into small discs. 

This is optional. You could just break them up and use bigger pieces of crayons. It just depends on the end result you want. I wanted to have a lot of colors and a lot of control over where the colors melted in each letter. So this was the way to go for me!

img_8982

Step 3: Plan out your letters.

Since I used just one mold and I had multiple names to make, this helped me get the most out of each bake. I knew I would have to make multiple batches because of duplicating letters so this helped me plan out how many bakes I would need for all of the names. (Especially when I was making some for all my nieces and nephews.)

img_8991

Step 4: Place mold on baking sheet and pick your colors!

This is the fun part! You can go all in and mix them all or you can get creative and try different color combinations! Here are a few of my favorites.
– Cool tones (blues, greens, purples)
– Warm tones (yellows, oranges, reds)
– Mermaid tones (purples, pinks, light blues)
– Dino tones (greens, yellow, orange)
-Cotton Candy tones (Pinks, blues, white)

img_9002

Step 5: Start filling your letters with crayons!

If there are certain colors you want to see on the front of each letter (for example if you want some variety from every other letter in the name) pay close attention to what color crayons you put in first. These colors will make up the front of each letter.

img_9014

Special Note: Make sure to fill each letter up to the edge (at least with this mold.) Once the crayons melt down, each letter will end up being about 1/2-3/4 inch thick. This is good! You don’t want your letter crayons to be too thin or they will just break when you go to color with them.

img_9019

Step 6: Fill up all your letters and double check that you have as many as possible in this batch!

img_9020

Step 7: Place baking sheet with mold inside oven.
Step 8: Turn oven on and up to 225 degrees F. (Thats right – you don’t need to preheat!)
Step 9: Let crayons melt in oven for 20 minutes.

img_9024

Step 10: Remove crayons and let them harden for 1 hour on your counter.

(Do not put in fridge.) 

img_9027

Step 11: Once hardened, carefully pull each side away from the mold BEFORE trying to remove it. Then gently (starting from the LONGEST edge of each letter) remove each letter.

Note: Depending on the brand of crayon you buy, you might notice that the back of each crayon letter is white. This is a sign of impurities in the original crayon itself and you can take a paring knife and scrape off the white if you so choose.

img_9041

Step 12: Enjoy! Give as a gift. Start coloring or even make some more!

Until next time – Best + Blessings!

image1-2

Friday FIVE | My Five Favorite Places to Shop for Fall Decor

If you follow me on Instagram, you know that I’ve had Fall on the brain all week and I’ve been showing you all my Fall Decor pieces. And today in my Insta-stories, I’m showing you how I styled some of them! (You can check out my Instagram here if you don’t follow me already.)

Continuing in the same vein, I bring to you this week’s Friday Five Post – My Favorite Places to Shop for Fall Decor (on a budget, of course!)

Fall Decor Ideas Friday Five Chrisi Nikole 1

  1. Dollar Tree
    I mean come on people, everything is ONE dollar here! Did you know that they sell faux floral stems now?  They are pretty nice y’all. Plus, our local Dollar Tree had a huge selection of them and lots of other decorations. DT is also a great place to buy decor that you can experiment on, that way you don’t ruin the more expensive stuff you buy!

    Fall Five

  2. Michaels
    This one is probably a no brainer. I get lost in the aisles of Michaels often – it’s just one of my happy places! One downside, is their prices. You want to catch them when they’re having a good sale and you have a 20% off your entire purchase coupon. Money Saving Tip: Subscribe to their emails and always check online to see if they are running any “Buy Online Pick Up In Store” discounts. Sometimes they have 40% off your entire BUPUIS (I just made that acronym up) purchase! Always check online first.

    Fall Decor Ideas Friday Five Chrisi Nikole 2

  3. Walmart
    Here you’ll have to sift through some of their tacky Halloween stuff in store to get to the good stuff BUT their prices are pretty great! Suggestion: Don’t just shop in store. Shop online! They have tons of items online (keep in mind, some of these are not sold directly by Walmart) and many of them have FREE 2 Day Shipping!

    Fall Decor Ideas

  4. Target
    First, check the dollar spot THEN check the home decor aisles! Target is most likely a no brainer to you but it’s a favorite of mine so it HAD to make the list!
  5. Home Goods / TJ Maxx / Marshalls
    No pictures for this one because you can’t shop online. BUT this doesn’t mean you shouldn’t check them out! Glass pumpkins, faux floral arrangements, dishes, trays, etc. They have a great selection!
  6. BONUS: Kroger
    Kroger’s selection on faux pumpkins is really good this year! They have a handful of different sizes that look pretty realistic and they have some cool colors too. My favorite from Kroger this year has to be their green faux pumpkins. They are a breath of fresh air from all the “normal” bright orange pumpkins.

Until next time – Best + Blessings!

image1-2

Styling Small Spaces | Guest Bathroom | Week 1

Yay! We’re here. It’s week one of my first series on the Whatsoever’s Lovely Blog and today I’m sharing my Guest Bathroom Refresh with you! When it comes to styling small spaces, I consider myself a novice pro. Ha! Basically, I’m really good at trial and error and have 6 1/2 years of “make it work” moments to prove it. *wink*

For the first 5 1/2 years of David and I’s marriage, we were renters. But now that we live in our first “official” home, we have really taken our creative liberties and have had a BLAST decorating and making this place our own. (Note: By “we” I mean – David does all the heavy lifting and projects that require major power tools and I do the easier, prettier things! #MatchMadeInHeaven)

Without further ado, let’s get into our guest bathroom!

Guest Bathroom Redo Before

Here is what our guest bathroom looked like when we first moved in. Pretty nice, huh? We were unbelievably blessed to buy our condo from close friends with great taste! *wink* So when we moved in, we had a nice, clean, remodeled, blank slate to work with in the majority of our rooms.

Guest Bathroom Ideas Redo 1GUEST BATHROOM IDEAS REDO 2GUEST BATHROOM IDEAS REDO 3GUEST BATHROOM IDEAS REDO 4

As you can see, this room didn’t need much but for us it needed some color. Don’t get me wrong – I LOVE white walls. L O V E them. But I like to decorate with different colors, textures and natural wood and thats exactly what I did in this space.

ACS_0291

Today’s Tip on Styling Small Spaces: Don’t over do it. You don’t have to tear out a vanity or repaint the walls to make a big impact when it comes to styling a small space. Keep it simple. Small, thoughtful changes can go a long way! Start by restyling a shelf or switching out the towels in your bathroom. You don’t have to take on a huge project starting out. Just do what works for you (and your budget!)

Guest Bathroom Redo After

Next Tuesday I’ll be sharing an even SMALLER space right in the heart of our home. Come back next Tuesday to see what room it is and if you want a closer look at this project, I’ll be sharing some videos on my Instagram stories today. You can follow me here!

Until next time – Best + Blessings!

image1-2


Fall 2019 Home Decor Mini Collection | Chrisi Nikole

I have been so excited about this release and I’ve been talking about it a lot lately on my Instagram and a little on my personal Facebook. You guys – it is officially here and you can OFFICIALLY begin placing your orders! *clapping with joy*

So without further delay, I present to you my first ever Fall Mini Home Decor Collection!

Custom Hand Lettered Door Mat

Custom Hand Lettered Door Mats
+ Dimensions – 24 inches x 35 inches x 1 inch
+ Rugged coir bristles (from coconut!) scrape off dirt, mud, moisture and debris
+ Vinyl backing helps keep mat in place
+ UV-protected color to assist in resisting color fade
+ Easy to keep clean – just vacuum or shake the rug

Hand Lettered Custom Faux Pumpkins
Custom Hand Lettered Faux Pumpkins
+ Available in 2 sizes. Small (6.5in) and Medium (9in)
+ Available in 2 colors. Orange and Off White
+ Unlike real pumpkins, you can reuse these over and over every year! Just carefully store them in a container, away from direct sunlight.
+ Easy to keep clean – gently wipe them down with a dry or damp soft cloth.

Hand Stamped Hand Lettered Book Stacks

Custom Hand Lettered Book Stacks
+ 
These may vary a little in size because they are REAL books that are being repurposed.
+ Each book will be at least 1 inch thick and at least 6 inches long. (The books shown here are around 7 inches long)
+ Each set of books will be close to the same size unless you specify that you would like more variety. 🙂
+ The outside of each book is the color of it’s natural pages. (White, off white, ivory, etc.)
+ Each stack will come beautifully tied together with twine.

Shipping Details for Door Mats (weight 7lbs)
UPS Ground – $13.27 per item Arrives in 2-3 days 
Fedex Ground – $12.77 per item Arrives in 2-3 days
USPS – $14.80 per item Arrive in 4-5 days

Shipping details for pumpkins and book stacks will depend on the quantity and size of the items you order. I will calculate shipping order by order and will discuss that with you at time or purchase. 🙂

THANK YOU! THANK YOU! THANK YOU! I am so excited to release this collection and I am ready to take your orders! If you would like to order something, you can follow this link to my instagram or this link to my facebook and send me a DM! (Or if you know my phone number, you can text me. Ha!)

Best + Blessings!

image1-2

PS – As a creative entrepreneur, this makes my heart soar! Last night during Face Mask Chat LIVE I spoke a little bit about my small biz background, my relationship with failure and why I do what I do. I felt compelled to share these things because you all were asking questions about what exactly I do and honestly, I needed clarification myself! So over the last month or so, as I was putting this collection together, I searched my heart and prayed about this very thing and I’m so glad I was able to share it with you all last night! Maybe one day I’ll write a blog post about it but for now, if you wanna know the details – check out the replay on my Instagram before it is gone. 🙂

Styling Small Spaces | Series Alert!

It’s 2019 and small spaces, tiny homes and minimalism is still on trend and going strong. I wouldn’t consider David and I minimalists but we certainly are intrigued by tiny living and we’ve incorporated a lot of minimalistic ideas into our own 1,200 sq. ft. home. #CondoLife

We bought our first home this past November and it didn’t need much work at all! (Major selling point, indeed!) This gave us the ability to work mostly on making this space our own and within our budget. Which is why I get to share with you my first ever blog series about styling small spaces!

I’ll be sharing how I plan out a room refresh, set a practical budget and use design and color to make small rooms feel bigger and more open (without busting down walls! HA.) I’ll even show you how to freshen up a small space using things you most likely already have in your home, it will simply require a little creativity and imagination.

I am so excited about this series, which is why I couldn’t wait to tell you all about it! Making your home your own and on a budget is something I am super passionate about. I don’t believe for one second that you have to have a pocket full of cash and all new furniture to decorate your home and love it. Don’t believe me? Well follow along and see if I can change your mind. *wink wink* You do believe me? Great! You follow along too and maybe something will catch your eye and spark some creativity in you!

I’ll publish a new “Styling Small Spaces” post every Tuesday for the next 3 weeks! From a closet to a bathroom and from a patio to a pantry, you’re going to see it all and I hope you invite a friend. We all can use some creative inspiration now and then!

Until next time – Best & Blessings!
image1-2

Top Five Friday | #1


Here it is folks! My first EVER “Top Five” list.
And what better list to start with than a top five BIBLE JOURNALING supplies list! Yep. Here it is – the one you’ve all been patiently waiting and asking for!

(Important Note: This list is shop-able. Meaning you can click on the pictures and it will take you to the Amazon listing where you can purchase the item for yourself! *Please note if you purchase it through my link, I will receive a small % of commission.* Thank you!)

#1. JOURNALING BIBLE

ESV Single Column Journaling Bible by Crossway
Price: $39.15

I have all the heart eyes for this Bible! It’s warm chestnut brown cover with super cute leaves etched into it. Oh my. Also, it was my very first journaling Bible gifted to me by my sweet husband a few Christmas’ ago. (I just love him!) If you are in the market for a good journaling Bible, I highly recommend this one!

#2. WATERCOLOR

Artists Loft Fundamentals Watercolor Pan Set, 36 Colors
Price: $7.00

This is a great first watercolor set. I have used this one for many different projects such as card making, brush lettering and especially Bible Journaling. And it’s just $7! That’s a steal.

#3. WASHI TAPE

Zeker Washi Tape Rolls Set, 23 Rolls
Price: $13.99

Y’all know I love me some washi tape! David would even go as far as to say that I have an obsession – but I don’t. It all fits into one drawer in my office! #success Anyway, this set of washi tape is also a GREAT starter set. It’s all solid colors – ranging from cool to warm colors – and it’s thin so you can practice mixing and matching different color tapes without over doing it! (If you can do such a thing. 😉 )

#4. HIGH QUALITY PENS

Pentel Arts Sign Pen – Assorted Styles – Pack of 3
Price: $10.17

Before you *gasp* over paying a little over $10 for 3 measly pens – hear me out. These are NO ordinary pens. I have had mine for months now and they still aren’t showing wear & tear. AND you will be surprised at how easily you keep track of pens you’ve paid decent money for! #funnybutserious

This set is also awesome for the simple fact that each pen has a different tip and different ink. For example…
The Original Sign Pen has a durable fiber tip that will not break down.
The Sign Pen porous point pigment ink pen is acid-free, fade proof and water resistant.
The Sign Pen porous point water-based ink pen features a brush tip.

#5. LETTER STICKERS

Simple Stories Snap Letters – Bold Colors
Price: $3.86

Letter stickers are a great alternative to always writing out your text. It adds depth to your page and helps make your text POP off the page! Plus, at less than $4 for 8 sheets – you can’t beat that!

That’s it! This marks the end of my first ever TOP FIVE FRIDAY post. I hope you enjoyed it and found it helpful! If you did, please let me know in the comments below. Or if you have any questions, comments or maybe your own suggestions – pretty please comment below. I love hearing from you!

Blessings,

image1-2

DIY Conversation Heart Balloons

Okay, let me start off with this. I LOVE love. Seriously. Anytime I see a couple who are just indisputably in love – my heart jumps, I uncontrollably smile and I get all the warm fuzzy feelings inside. *insert the gagging noises of all the haters.* But seriously, I do! And I know that not everyone feels this way and thats totally fine. But I thought it was important for you to know now, before you dive too deep into my blog because you are going to find it  E V E R Y W H E R E  here.

diy-valentines-2017-conversation-heart-balloons

With that being said, I really like Valentines day. Not because of the chocolates or flowers I get from my sweet husband, though that is a bonus, but because everything is just plain cute! (I mean, have you seen Target’s Dollar Spot recently! *insert heart eyes emoji*) Now inevitably, cute stuff gets me in the mood to DIY! Therefore I bring to you these DIY Conversation Heart Balloons!

diy-conversation-2017-heart-balloons-1

What will you need?
-foil heart balloons (mine are from Dollar Tree because they’ll fill them up for free!)
-black letter stickers (these are from Hobby Lobby)
-tape

diy-valentines-2017-conversation-hearts-balloons-3

Note: Hobby Lobby has tons of letter stickers. You can choose whichever ones you like, but I went with these super simple ones because they looked the most like the text on actual conversation hearts.

diy-valentines-2017-conversation-heart-balloons-2

Roll 1 or 2 pieces of tape and stick to the back side of the balloon. I consider the back side to be the side with the barcode on it. Then press the balloon down onto a smooth flat surface, so that it doesn’t fly up while you’re trying to put on your stickers.

diy-valentines-2017-conversation-hearts-balloons-4

Now it’s time to decide what text you want on your balloons. I chose “BE MINE”, “LUV YOU” and “QT PIE”. Partially because 1 package of the letters I bought, have enough to make all three phrases. (Anyway to save, y’all. Anyway to save!) 

diy-valentines-2017-conversation-hearts-balloons-5

Then get your sticker on! Remember to line up the bottom of each sticker to keep them straight. If you don’t though, it’s okay! I’m pretty sure I have consumed more conversation hearts where the text is crooked or illegible than I have perfectly straight ones.

diy-valentines-2017-conversation-hearts-balloons-6diy-valentines-2017-conversation-hearts-balloons-7diy-valentines-2017-conversation-heart-balloons-8
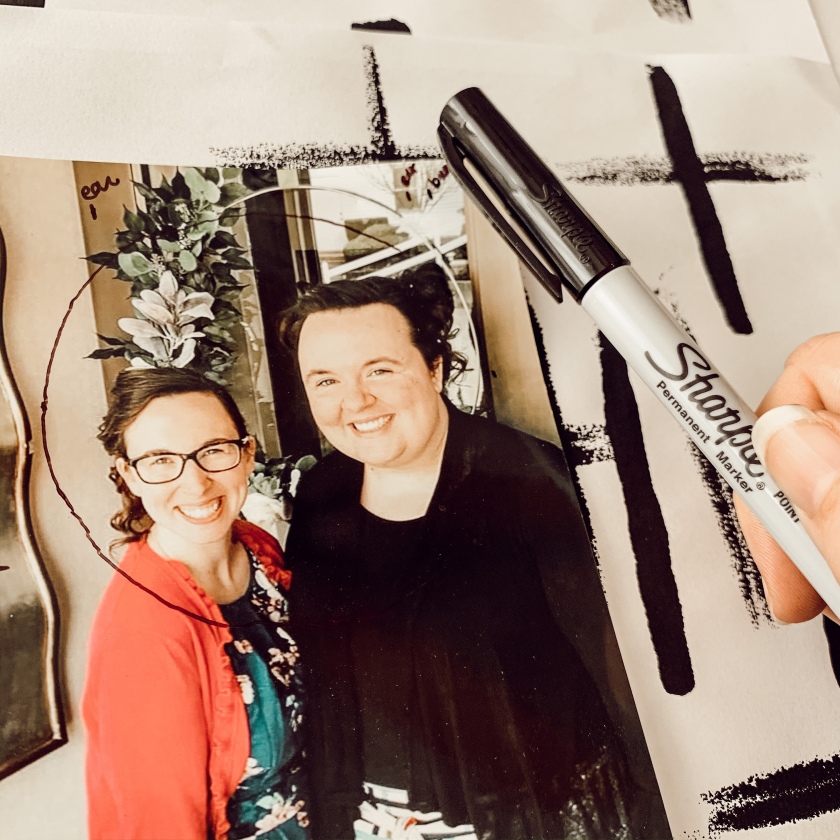
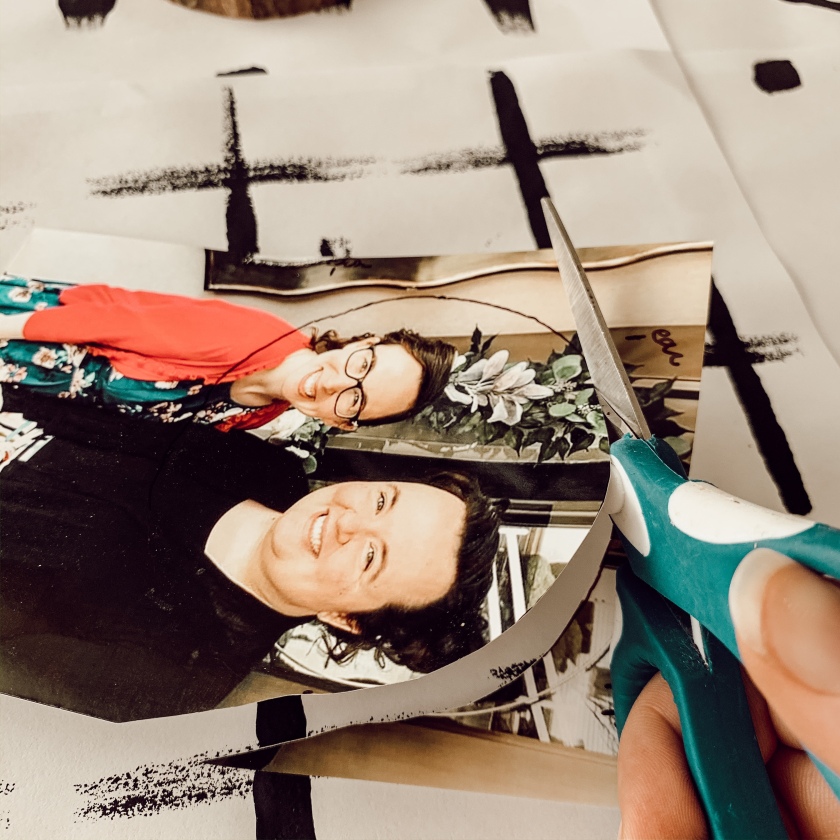
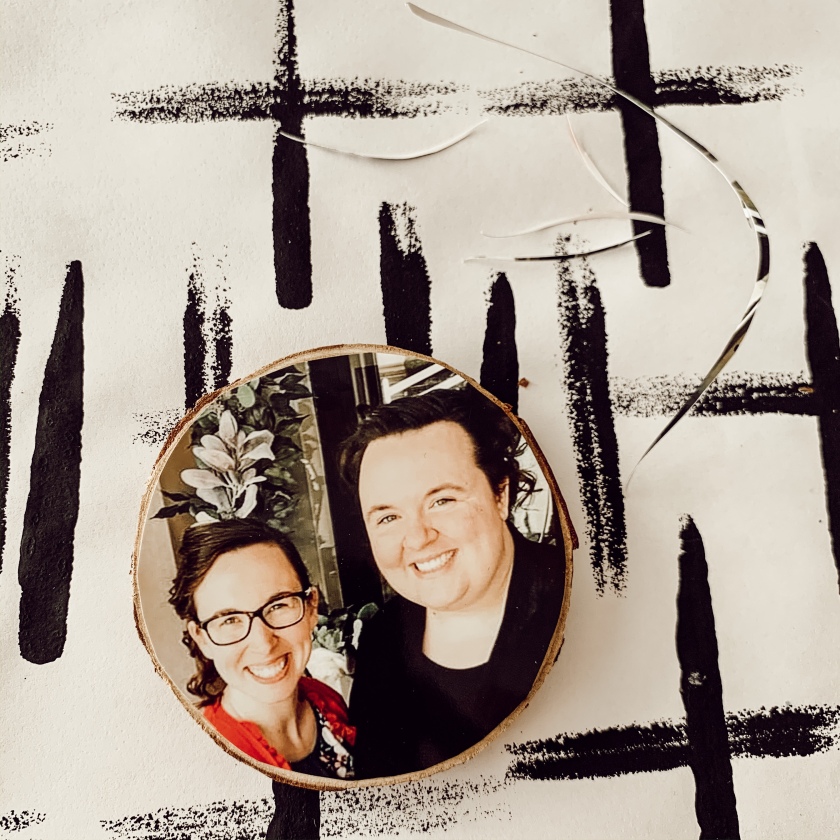
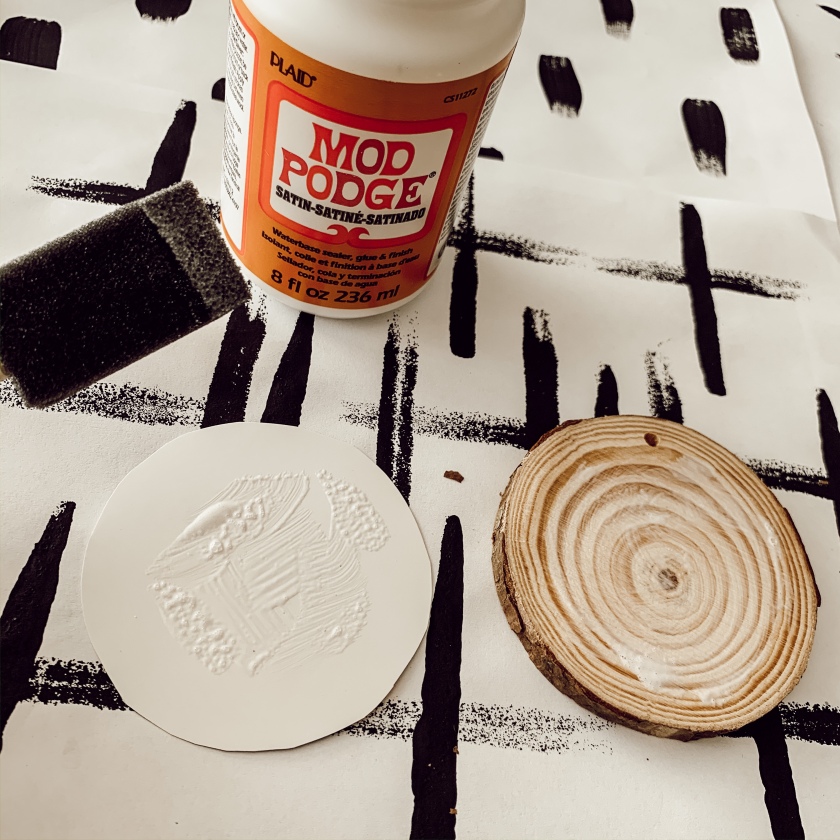
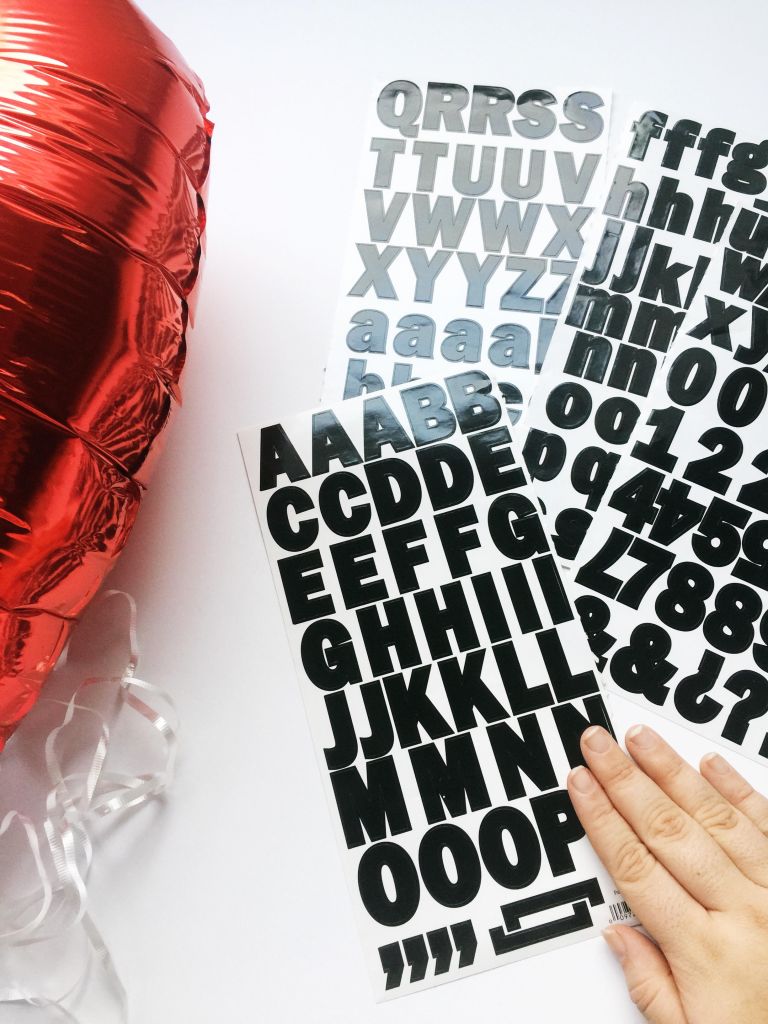
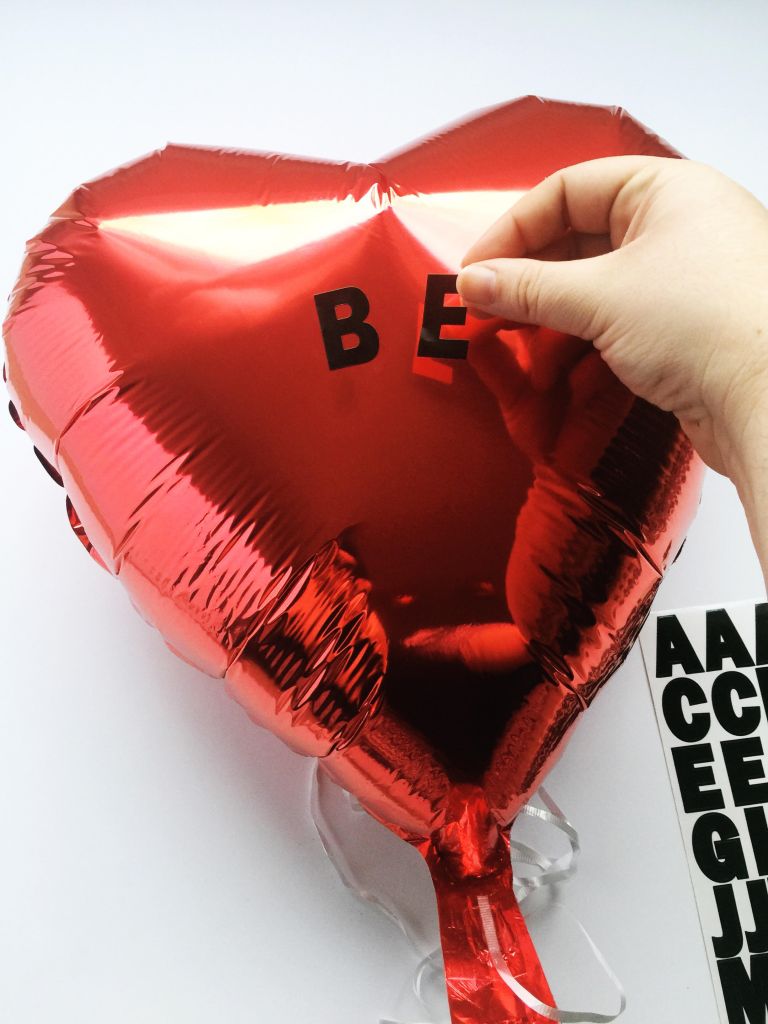
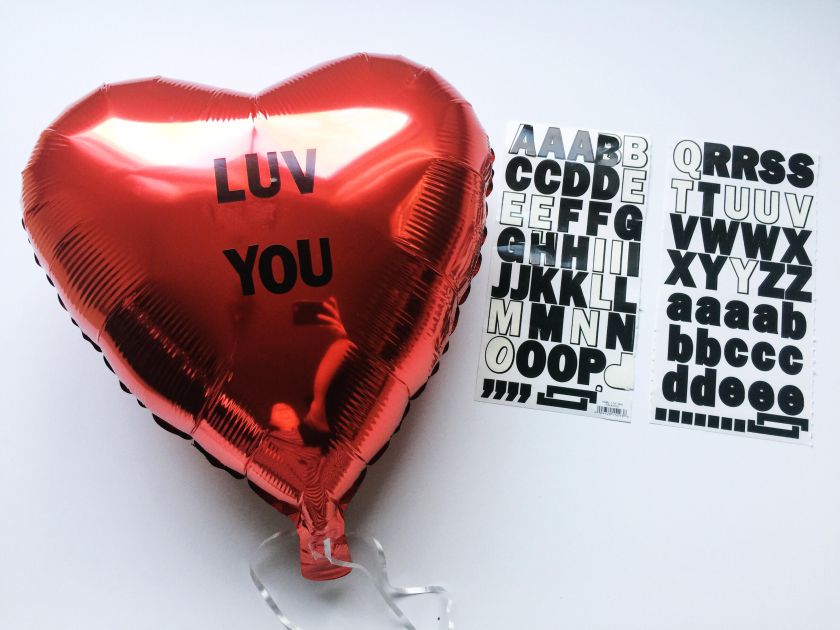
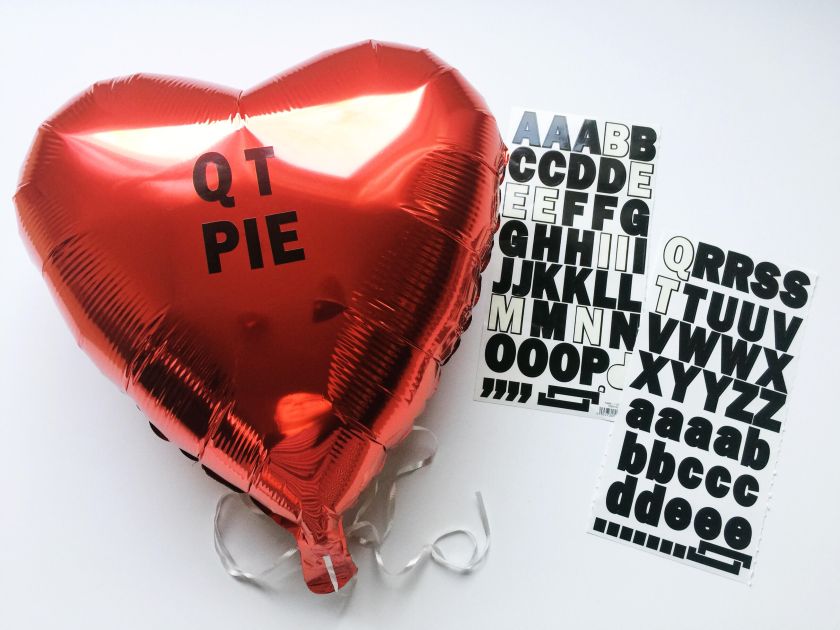
Voila! In no time you have three, super cute, one of a kind balloons you can add to any Valentine’s Day gift!

Happy (almost) love day!

image1-2